Thursday, January 19, 2006

Back Again..with stacking images

I'm sorry to have let the group falter, but I've been busy, plus my traveling in December. But tonight I took some time to finish an earlier experiment with multiple exposures. My weakness in this area is that my knowledge of using "layers", layer masks, and blend modes in PS is limited to what I've learned by trial and error: and that doesn't cover stacked images. But tonight I found a good tutorial on how to do stacked images, and I think it worked pretty well with my experimental target.

This fall I took a lot of tripod based shots of my maple tree, as it was in it's bright yellow bushy stage, and losing leaves. It was windy, and so I thought it would be nice to capture the leaves rustling and falling.

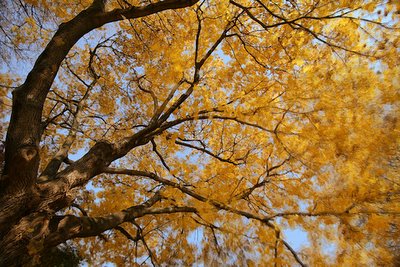
Tonight I combined about 8 of these images as an experiment, using the tutorial at: Image Stacking.

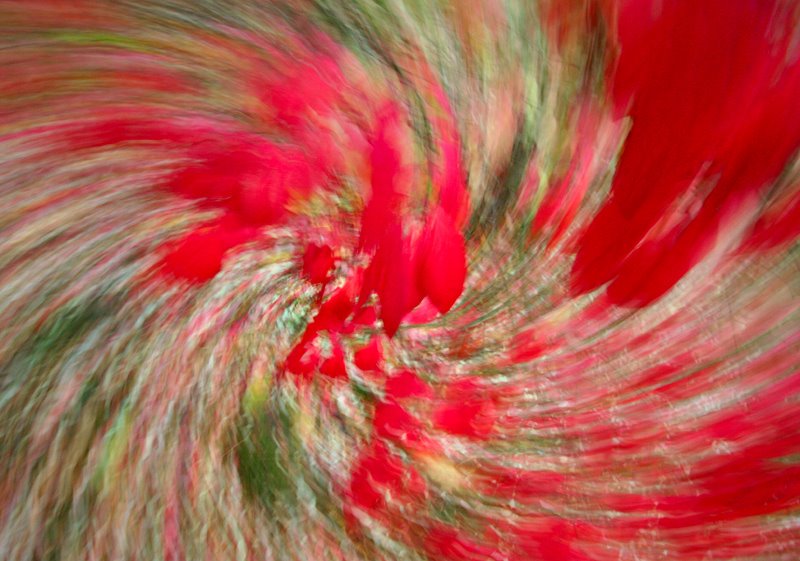
Here's the finished result, where I've cropped so as to to allow maximum viewing of the "impressionistic texture" gained by the stacking:


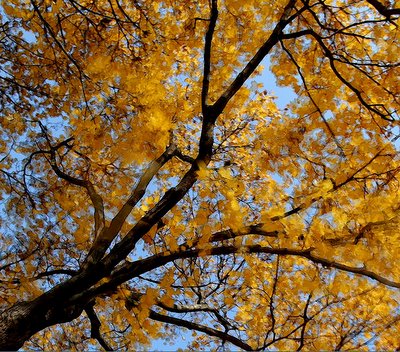
But the full size version isn't bad either. Here's the full frame, again, finished by sharpening and then softening:

1 Comments:

Blogger ursula said...

Neil,

That's a very interesting method of stacking images, quite different than the methods I've used so far.

In reality it doesn't stack the whole image, but portions of it, which would explain why it looks so clear even after 8 images.

The result is really beautiful. It gives a very good sense of motion. It keeps the overall feel of the original photos much better. It also looks less dreamy in a way. I like the result very much.

I'll try the technique this evening.

Yeah!

12:36 PM  

Post a Comment

<< Home

Sunday, November 13, 2005

For the sake of comparison, I went for the same "effect" using my own special favorite motion blur technique. Here is the result. This is done using the same motion I used for the multiple shots, but in this case, I did it in a long exposure:


To me, this is more inline with my own "impressions", at least in this case. But clearly they do produce different effects, and I've only just begun to explore the new technique, and this motion blur one is my "usual".

Hmm...maybe I'll try a combination with multiple images.

Comments welcome, as usual.

14 Comments:

Blogger ursula said...

This one is much lighter and little green shows. It also looks a fair bit flatter than the other one (it's hard to say why, if it is the method or just the picture).

This one shows a lot more colour streaks, and little definition except the definition caused by movement.

Both pictures are centered, which gives them a sort of static/active feel: the spiral is vibrant, active, the centered composition is sort of static. It's an interesting concept, sort of like, "Stop! Go!".

10:52 AM  
Blogger Unknown said...

I found I liked these more if I kept the fixed point slightly more off center, following something of a more traditional rule like thirds or the golden mean.

The second of the two images in my blog right now demonstrate this effect, sort of like a spiral but larger than the camera frame. I used one of the focus points in the camera as a visual anchor for the rotation, so that I knew roughly where I was spinning around.

11:29 AM  
Blogger Neil said...

Ursula/Gordon: Thanks for your comments. I didn't do too much to this photo, and it's full frame, simply because I was comparing the two techniques. I would generally crop these to keep the still part off center. Same with the green level, which was increased in the other shot. I didn't do much here also because the original has a real watercolor feel.

11:37 AM  
Blogger Unknown said...

I wouldn't try to crop it to make it off center, just shoot it that way instead.

2:08 PM  
Blogger Neil said...

Gordon, I don't think that's possible; I am rotating the camera, while zooming. How can you get an off-center fix point while doing that?

2:52 PM  
Blogger Unknown said...

It is possible, you just need to have a frame of reference - I.e., always have the center of the flower at a given off center point in the frame. When I shot the images at this link I just the top corner of one of the focal point rectangles as a reference - each time I rotated the camera or zoomed the lens I'd make sure the center of the flower that I wanted roughly stationary was over the same point in the frame.

This lets you do a spiral across the frame that can be pretty cool.

I have some others were it is even more obvious but I don't have the scans handy - I'll check later tonight.

3:12 PM  
Blogger Unknown said...

I realise that you've been shooting these in rapid fire, as a single burst while zooming - it might be harder to do what I described above in that case - a somewhat more methodical approach might be needed - just a different twist on it I think.

3:14 PM  
Blogger Neil said...

Ah, what you didn't catch in my writeup is that the second post is not a multiple exposure--it's a single frame! That's my favored technique for my more recent abstracts.

Or maybe you were only referring to my first post, which was multiple. Yes, I can do that differently. I mainly did it that way because the camera twist motion is quite natural to me now when shooting, since I do it a lot. The only difference, which I had never tried before, was to have the shutter on rapid fire.

So what I thought was interesting here was I have two techniques with basically the same camera motion--one multiple exposures, one single.

As you said in your own blog, FP is a starting point. I've been experimenting with hybrids of the two also!

3:49 PM  
Blogger ursula said...

Neil, as you zoom the lens, could you ever so slightly move in a 45 degree diagonal (up or down depending of whether you're zooming in or out)? I suppose it would be very difficult to coordinate those two movements, but in theory it should produce an off-centre spiral.

6:13 PM  
Blogger Unknown said...

With some 3 way tripod heads it is actually pretty easy to zoom and rotate around a point, because the pivot point is offset from the lens - so you can rotate the camera and lens at the same time, zooming in, while moving across the image. I've done a fair number of zoom/blur shots that way, single or long exposures. Makes for a different effect than the centered zoom burst.

6:42 PM  
Blogger Neil said...

Ursula, that sounds interesting--I'll have to try it.

I am not sure those approaches will produce a sharp central area in the spiral in the long exposure method, but its worth trying.

In any case, it's actually quite easy to crop the motion shots--it's been my experience that there's always some parts of the frame that are interesting, and other parts that are not, and cropping has the advantage of controlling this. My
whirlwind passion shot,

http://www.dpchallenge.com/image.php?IMAGE_ID=239379

is a good example of this.

7:00 PM  
Blogger Unknown said...

True - I guess I've just had get it right in the full frame ingrained into my brain for long enough that cropping so much just feels wrong somehow. I'm usually looking for images that can be printed - at least I'm trying to think that way more and more, so large crops are something I try to avoid if I can.

7:08 PM  
Blogger ursula said...

I just got a tripod a couple days ago for my birthday, a sturdy Manfrotto with a pretty nice head. I have to try and see if I can do with it what Gordon describes here.

7:48 PM  
Blogger Neil said...

Well I agree about full frame Gordon, I certainly try that with my non-abstract photos. If you can do it with these, more power to you! I don't usually use a tripod on these. I've never been able to spin the camera on any of my tripods (I can do Arcs), but I don't have a head that will really spin with the camera off axis. Love to see what setup you might suggest.

8:29 PM  

Post a Comment

<< Home

FPPI - Assignment 1

This is the first experiment corresponding to multiple image capture/combination.

In this case, I took 7 pictures, rotating and zooming the camera while I had it on rapid fire.

I combined them in PS CS, where each later was successively more opaque from top to bottom.

I used a base image consisting of the ground cover below this bush which was in the throws of its final fall colors.

After adjusting opacities, I flattened. Then I copied the flattened layer twice: and combined them with multiply to get contrast. I also added a levels layer, adjusted, a curves layer, adjusted both for contrast and to bring up the greens.

I am not really satisfied with the image, but I will move on to my next attempt.

Comments are welcome.

1 Comments:

Blogger ursula said...

Well, I think it's a pretty good start. You managed to keep the frames nicely centred while spinning the camera. The reds and greens are beautiful, as is the spiral.

8:08 PM  

Post a Comment

<< Home